Processing Transactions
For location changes started by custom functions such as check-in and check-out to be completed within iTrackIT, the picking process must be completed. To start the picking process a picking list must be printed, and then marked as complete. To re-access, the already generated picking list the "Transactions" or "Picking Lists" pages can be used.
Generating picking lists
To generate a picking list, first, go to the "Transactions" page. Then, using the custom function drop-down menu from the toolbar at the top of the page, select "Print Picking List". If you would like more information on navigating iTrackIT please read our Navigation article.
In the popup box that appears, add the type of transaction (for example, "Check In" or "Transfer") to be printed into the drop-down box labelled "Transaction Type:" next select the current location of the file using the "Location:" drop-down box.
If you are unsure of the location and checking out a file it can be found in the column titled "From". If you are checking in a file the location can be found in to "To" column.
Once you have filled out the required boxes press the orange "Print" button at the bottom of the popup box.
A picking list should now be generated and opened in the browser's print preview screen. Depending on the browser and browser settings this page might not be generated and the file will have to be downloaded as a PDF file manually. This process is explained in the section below.
Accessing already generated picking lists
It is possible to open and then reprint already generated picking lists. This can be done either from the "Transactions" page to view the picking lists of in-progress transactions or the from the "Picking Lists" page to view a list of all previously generated picking lists, both of these are located under the "Transactions" menu option.
If any of the columns mentioned in this article are not visible it may be necessary to use the horizontal scroll bar at the bottom of the screen or the column may have been hidden. To check if a column is hidden, please look under the "Columns" toolbar option. For more information, please read our
Opening or downloading a Picking List from the "Picking Lists" page
To open the "Picking Lists" page first click on the "Transactions" menu option to open the drop-down and select "Picking Lists". Below is an example of the "Picking Lists" page.
To view a picking list the hyperlink in the "DisplayLink" column can be used to download the picking list as a PDF file, or the desired transaction can be selected with the round radio button in the far-left column and the "Print Picking List" custom function can be used to open the browsers print preview page.
Opening or downloading a Picking List from the "Transactions" page
First, click on the "Transactions" menu option from the top bar, then select "Transactions" from the drop-down menu, this should open a page that looks like the example shown below.
Locate the "Picking List" column and click on the desired hyperlink (the number underlined and in black) to open the picking list sub-page. An example of what this page looks like is shown below.
From here the process will be the same as when opening a picking list from the "Picking Lists" page: to view the picking list the hyperlink in the "DisplayLink" column can be used to download the picking list as a PDF document, or the transaction can be selected with the round radio button in the far-left column and the "Print Picking List" custom function can be used to open the browsers print preview page.
Marking the picking process as completed
Once the picking list has been printed and the picking process completed, the picked items can be marked as completed using the "Complete Picking" custom function. To do this, select the desired transactions from the "Transactions" page using the square checkboxes in the "#ID" column. Then open the custom function drop-down by clicking on the box and select the "Complete Picking" option. An image of the custom function drop-down is shown below.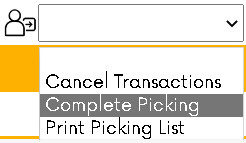 A screenshot of the function menu with the "Complete Picking" menu option highlighted.
Related Articles
Cancelling transactions
To cancel a transaction first go to the transactions page. Select the transactions to be cancelled with the round button, then select "Cancel Transactions" from the custom function drop-down. If a transaction has already been marked as "Completed" it ...Checking out files
To check out a file, first, navigate to the files page. It should look something like the example shown below. An image of the "Files" page. In order to check out a file, the status must be "Logged in" if a file is marked as "New file" the file must ...Checking in files
To check in a file, first, navigate to the files page. It should look something like the example shown below. An image of the "Files" page. In order to check in a file, the status must be "Logged Out". Then, using the square checkbox, select the ...Navigation
This article will describe how to navigate iTrackIT, the main screens and different ways to view information relating to records. The main menu On iTrackIT, the navigation menu is located at the top of the page and looks like the image shown ...Completing a search
On iTrackIT records can be searched for using a search form. In this article we will be using examples from the "Files" search, however, the same principles will apply to all of the available options (i.e. entities, boxes, or transactions). ...