Checking in files
To check in a file, first, navigate to the files page. It should look something like the example shown below.
In order to check in a file, the status must be "Logged Out". Then, using the square checkbox, select the files you would like to check in; this can be one or multiple files. Then, from the custom function menu option select the "Check In" option.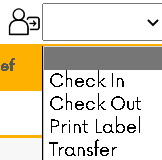 An image of the custom function menu.Once the custom function has been selected a message box will appear with the number of files being checked in written on it. If the number is correct, press the orange "Check In" button. If the number isn't correct press the "Cancel" button and check the files that have been selected.
Next, a second confirmation message will be displayed this time showing the files being checked in and the location they will be checked in to. If this is as expected, press the "Ok" button to close the dialogue and add the files to the transactions list.
For the file to be marked as logged in it will be necessary for the picking process in iTrackIT to be completed. This is explained in our Picking lists article.
Related Articles
Checking out files
To check out a file, first, navigate to the files page. It should look something like the example shown below. An image of the "Files" page. In order to check out a file, the status must be "Logged in" if a file is marked as "New file" the file must ...Transferring files
In order to transfer a file to another person first ensure that the file has the correct status. If a file has been logged out it can be transferred to other people. An example of the files search results with a valid file for transfer selected. To ...Creating new files
To create a new file first navigate to the "Create a File" page. This can be done two different ways: if a search has already been carried out in the files category, there is a create new record button inside the function menu toolbar which can be ...Navigation
This article will describe how to navigate iTrackIT, the main screens and different ways to view information relating to records. The main menu On iTrackIT, the navigation menu is located at the top of the page and looks like the image shown ...Processing Transactions
For location changes started by custom functions such as check-in and check-out to be completed within iTrackIT, the picking process must be completed. To start the picking process a picking list must be printed, and then marked as complete. To ...