Creating new entities
To create a new entity first navigate to the "Create an Entity" page.
There are two different ways to do this, if
a search has already been carried out in the entity category, there is a
create new record button inside the function menu toolbar. A picture of this button is shown below.
The other method to access the "Create an Entity" page is by clicking on "File Manager" button on the menu at the top of the screen and selecting the "Entity" option. Use the create button to open the "Create an Entity" page. A picture of the create button is shown below.
The create an entity page should look like the example shown below.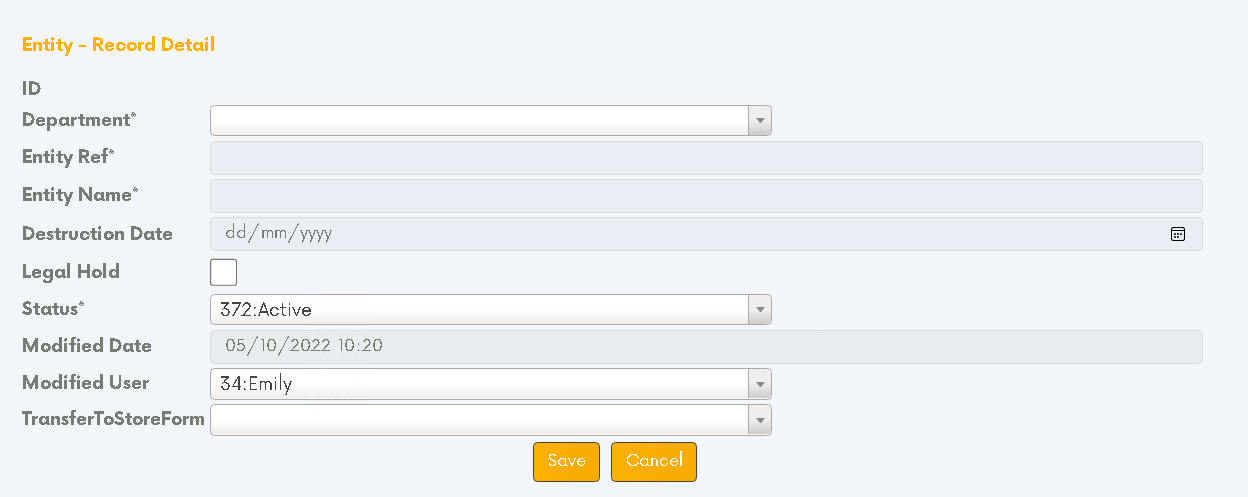 An image of the "Create an Entity" form
Once the form has been completed the orange "Save" button can be used to submit the form. If all compulsory fields have been filled out correctly this will create the entity. Fields are the boxes where data is entered into the form, these can be seen to the right of the row headings. To find out more about how each field is used and how to enter data into them please read the descriptions below.
The "ID" row contains the ID of each record. This field can't be edited and will be filled by iTrackIT automatically when the form is submitted.
The "Department" row is a compulsory field that is used to associate an entity with a department. To select a department, click on the white drop-down box and select the relevant option by clicking it. If there are a lot of options, they can be filtered by typing text into the text box at the top of the drop-down. The box can also be scrolled by using the scroll bar on the right of the box, or by hovering the mouse over the drop-down and using the middle mouse button.
The "Entity Ref" row is a compulsory field that is used to assign a reference to an entity. To enter data into this field, click on the text box and type in the relevant data.
The "Entity Name" row is a compulsory field that is used to provide a full name for the entity. This field can be used the same as the entity reference field, to use it click on the text box and type in the relevant data.
The "Destruction Date" is used for files that have to be deleted after a certain date, to assign this either enter the date manually by clicking on the text box and typing it or by clicking on the calendar to open the date selector tool and selecting a date.
The "Legal Hold" checkbox is used to mark entities whose files have a legal hold placed on them and cannot be removed.
The "Status" row is a compulsory field which should be used to mark if an entity is active or inactive. To select an option click on the drop-down box and select the relevant option. By default, this will be set to active.
The "Modified Date" is a compulsory row which shows the date that the record was last modified, this field cannot be edited and will be completed automatically by iTrackIT.
The "Modified User" is a compulsory row which shows the user who last modified the record, this field will be filled automatically by iTrackIT and like the modified date field this cannot be edited.
The "TransferToStoreForm" is a field that can't be edited and will be filled automatically for boxes that have been imported using the "Transfer to Store Forms" with the name of the file used to import it.
Suggested article: Creating a new department
Related Articles
Creating new files
To create a new file first navigate to the "Create a File" page. This can be done two different ways: if a search has already been carried out in the files category, there is a create new record button inside the function menu toolbar which can be ...Creating a new file type
To create a new file type, first, navigate to the "Create a File (Type)" page. There are two different ways to do this: if a search has already been carried out in the files (type) category, there is a create new record button inside the function ...Creating a new box
There are a couple of different ways to create new boxes, this article shows how to create them using the "Create a Box" form, however they can also be created using the transfer to store form. To create a new box first navigate to the "Create a Box" ...Creating a new department
To create a new department first navigate to the "Create a Department" page. There are two different ways to do this: if a search has already been carried out in the Departments category, there is a create new record button inside the function menu ...Creating or modifying users
Users can be created or modified by users with access to the Security profile. This can be done by opening the "Security" tab, selecting the "Users" option and then filling out the form which is shown below. Once all of the compulsory fields have ...