Creating a new box
There are a couple of different ways to create new boxes, this article shows how to create them using the "Create a Box" form, however they can also be created using the transfer to store form.
To create a new box first navigate to the "Create a Box" page. There are two different ways to do this: if a search has already been carried out in the boxes category, there is a create new record button inside the function menu toolbar which can be pressed to access this page. A picture of this button is shown below.
The other method to access the create a box page is by clicking on the "Archive Manager" button on the menu at the top of the screen and selecting the "Boxes" option, this will open a search form. Use the create button at the bottom of the page to open the create a box page. A picture of the create button is shown below.
The create a box page should look similar to the example shown below.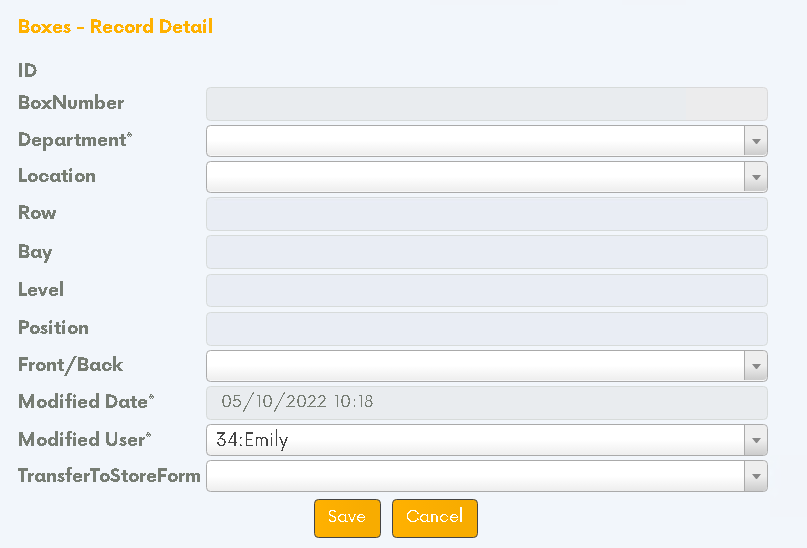 An image of the create a box page.
Each row on the form has some text on the left this is a title relating to the information held in the boxes on the right. In this article, the boxes on the right will be referred to as fields. Depending on certain factors like the level of access a user has some of the fields will be editable. Any heading with an asterisk (*) next to it is compulsory and must be filled out before the form can be submitted.
Fill out the fields as required and once you have finished press the orange "Save" button at the bottom of the page to submit the form. If all the required fields have been completed the box will be created. For more detail on what each row does and how to use it please read the description below.
The "ID" row contains the ID of each record. This field can't be edited and will be filled by iTrackIT automatically when the form is submitted.
The "BoxNumber" row contains the number of each box, like the ID row this field can't be edited and will be automatically filled when the form is submitted.
The "Department" row is a compulsory row which contains the department that each box is associated with, to select a department click on the white drop-down box and click on the relevant option to select it. If there are a lot of options, they can be filtered by typing text into the text box at the top of the drop-down. The box can also be scrolled by using the scroll bar on the right of the box, or by hovering the mouse over the drop-down and using the middle mouse button.
The "Location" row contains the location where the box is stored, to select a location use the drop-down box, this will work the same as the department field. Click on the drop-down box to open it and select the desired location by using the left mouse button.
The "Row" heading refers to the row where the box will be stored in the previously mentioned location. To define this, click on the text box and type the relevant information.
The "Bay" row refers to the bay where the box will be stored in the previously mentioned location. To enter this information, click on the text box and type the relevant information.
The "Level" row refers to the level the box will be stored on at the previously mentioned bay. To specify this, click on the text box and type the relevant information.
The "Position" row refers to the position where the box will be stored. To enter this information, click on the text box and type the relevant information.
The "Front/Back" row refers to whether or not the box will be at the front or back of the shelf. To select an option, click on the drop-down box and click on the relevant item.
The "Modified Date" is a compulsory row which shows the date that the record was last modified, this field cannot be edited and will be completed automatically by iTrackIT.
The "Modified User" is a compulsory row which shows the user who last modified the record, this field will be filled automatically by iTrackIT and like the modified date field this cannot be edited.
The "TransferToStoreForm" is a field that can't be edited and will be filled automatically for boxes that have been imported using the "Transfer to Store Forms" with the name of the file used to import it.
Suggested article: Creating a new file type
Related Articles
Creating new files
To create a new file first navigate to the "Create a File" page. This can be done two different ways: if a search has already been carried out in the files category, there is a create new record button inside the function menu toolbar which can be ...Creating new entities
To create a new entity first navigate to the "Create an Entity" page. There are two different ways to do this, if a search has already been carried out in the entity category, there is a create new record button inside the function menu toolbar. A ...Creating a new file type
To create a new file type, first, navigate to the "Create a File (Type)" page. There are two different ways to do this: if a search has already been carried out in the files (type) category, there is a create new record button inside the function ...Creating a new department
To create a new department first navigate to the "Create a Department" page. There are two different ways to do this: if a search has already been carried out in the Departments category, there is a create new record button inside the function menu ...Creating or modifying users
Users can be created or modified by users with access to the Security profile. This can be done by opening the "Security" tab, selecting the "Users" option and then filling out the form which is shown below. Once all of the compulsory fields have ...